
Monday, September 30, 2013
Curious? Press play! (mail & win results)
Today's the day! I already know, but you don't...who is the winner of the mail & win and who will get the handmade Stoffer + Blik feather stamp? If you want to find out....watch this little movie I made for this occasion.
Sunday, September 29, 2013
Celebration
It's been quite busy the last couple of days. Lots of work, lots of wine, lots of inspiration and lack of time. I did manage to get something cool done for the mail & win announcement of Monday: I made a little movie to reveal the winner. I can't wait to show it to you, but I have to...
But the very best thing is my best friend's beautiful baby girl was born. That called for some baking! I have seen these tea bag cookies everywhere and they have been on my 'to-bake-list' for a while now. This was the perfect occasion. I made a big bag of them with a special twist, as a gift for the mom & dad. So they have something to munch on during those sleepless nights...
 It's regular cookie dough (flour, sugar and butter), cut in the shape of a teabag with a pink string through the hole. And then decorated with pink melting candy and chocolate. Cute & delicious.

 Of course I also made a special card for my smallest new friend.
But the very best thing is my best friend's beautiful baby girl was born. That called for some baking! I have seen these tea bag cookies everywhere and they have been on my 'to-bake-list' for a while now. This was the perfect occasion. I made a big bag of them with a special twist, as a gift for the mom & dad. So they have something to munch on during those sleepless nights...
Tuesday, September 24, 2013
Red
The only red things in my house are a red colander, a sports bag, a teapot and nail polish. That's it. You'd say I don't like red. But I do! When you are wearing blue jeans and a simple grey shirt, red fingernails can make all the difference. It adds a little spice. I love that. And then there is red (tomatoes) and there's red (cherries) and there's also red (chili peppers). Pick your shade...
The strawberry at the bottom is part of my 'Hello Sweetheart' postcard. You can get it here.

The strawberry at the bottom is part of my 'Hello Sweetheart' postcard. You can get it here.
Sunday, September 22, 2013
Autumn Risotto
If they would just skip the rainy parts, I really love autumn. It's always a little sad to see the days getting shorter, but there's also a lot you get back. Wearing a sweater instead of a jacket on a sunny autumn day, the sun low in the sky, long walks through the forest when the leaves are turning yellow and red. And the food. I love autumn food: (portobello) mushroom, pear, beet, eggplant, pumpkin...
This is one of my favorite autumn recipes: pumpkin risotto.
 This serves one: half of a small pumpkin // 1 small onion // 1 tbs of butter // splash of dry white wine // 60 grams of risotto rice // 350 ml of vegetable broth // olive oil // thyme (dried) // salt & pepper // 30 grams of grated parmesan cheese
Preheat the oven at 200 degrees. Wash the pumpkin and take out the seeds. Leave the skin on. Cut into 2 cm cubes. Put them on a tray with lining paper. Sprinkle olive oil on the cubes and season with some salt, pepper and the dried thyme (about two teaspoons). Put in the oven for about 30 minutes, until completely soft.
Heat the butter in a heavy-bottom pan. Cut the onion in pieces (not too small) and cook them in the butter for 5 minutes. Add the rice and mix it all together. Add the white wine and let it evaporate. When it's dry again you can add the vegetable broth little by little. Wait for all the liquid to be absorbed by the rice before you add the next bit. It should take about 20 to 25 minutes before you are out of vegetable broth. Keep stirring every now and then. Taste if your rice is cooked. If not, add a little boiled water and take a few extra minutes.
When the rice is cooked, you can add the parmesan cheese and 2/3 of the pumpkin. Mix together. Put it on a plate and place the rest of the pumpkin on top.
This is one of my favorite autumn recipes: pumpkin risotto.
Preheat the oven at 200 degrees. Wash the pumpkin and take out the seeds. Leave the skin on. Cut into 2 cm cubes. Put them on a tray with lining paper. Sprinkle olive oil on the cubes and season with some salt, pepper and the dried thyme (about two teaspoons). Put in the oven for about 30 minutes, until completely soft.
Heat the butter in a heavy-bottom pan. Cut the onion in pieces (not too small) and cook them in the butter for 5 minutes. Add the rice and mix it all together. Add the white wine and let it evaporate. When it's dry again you can add the vegetable broth little by little. Wait for all the liquid to be absorbed by the rice before you add the next bit. It should take about 20 to 25 minutes before you are out of vegetable broth. Keep stirring every now and then. Taste if your rice is cooked. If not, add a little boiled water and take a few extra minutes.
When the rice is cooked, you can add the parmesan cheese and 2/3 of the pumpkin. Mix together. Put it on a plate and place the rest of the pumpkin on top.
Friday, September 20, 2013
Aquarelle Wings
Here's something I have been working on recently. I've been researching, sketching, drawing and painting butterflies. It's unbelievable how many of these creatures there are and all so beautiful. The colors are amazing and so bright that they are really difficult to reproduce in aquarelle.


I am making a set of 5 or 6 postcards, or maybe more. I might go a little crazy on the butterflies, I can't help myself. I hope it won't be long before they are printed and I can put them up for sale at Stoffer + Blik. Don't hold your breath, it may take a while... but I'll let you know as soon as they're there! I'm also thinking about putting these aquarelle wings in a pendant for a necklace, who knows... wait & see.

Thursday, September 19, 2013
DIY plant labels

All year round I have all sort of pots and jars with potting soil in it. I try to grow my own herbs and honestly I am not really good at it. But I am persistent, I have to get it right someday. Not everything dies or never even starts living. Parsley and mint are doing great here. The more delicate herbs like coriander and basil are having a hard time with me. These pots can show nothing but plain soil for weeks and weeks, until I forget what seeds I put in. I used to write the name of the plant on the pot with a black marker. That's pretty permanent. I now have pots that say

You will need: wooden (flat) sticks of any sort // sand paper // saw // masking tape // paint brush or roller // cloth pins to hang them to dry the paint // chalkboard paint & any other color paint
If you use stir sticks, saw them at the length you want and make them smooth with sand paper. I rounded all the edges a little. Tape them so you cover the part you don't want to paint. Use chalkboard paint for the part you want to write on. Paint both sides. Hang it to dry, using the cloth pin. When they're all dry you can paint the other half. Tape the chalkboard side, so you don't get any color on there.

You can change the pattern of course, make the whole middle part chalkboard paint and just dip the tip in a different color.

Tuesday, September 17, 2013
A gift wrapping obsession
When there is a birthday or another occasion for a nicely wrapped gift, I get a little excited. And a little carried away sometimes. With stamps and everything, but hey... I think it's pretty. And I just assume, for my own convenience, that everything I like is also liked by my friends & family. They should. Or at least pretend they do and never let me find out...
So I was gift wrapping this still anonymous present for someone anonymous (he or she might be reading this too...). I usually use old paper I have laying around, because you can't really decorate ready-to-go gift wrapping paper. And I like to make it personal and handmade. It's also very eco friendly. I made colorful flag banners by carving one little flag and stamping it in different colors next to each other. It worked perfectly on this brown paper. I drew a thin line to connect the flags and voila: a banner was born.


So I was gift wrapping this still anonymous present for someone anonymous (he or she might be reading this too...). I usually use old paper I have laying around, because you can't really decorate ready-to-go gift wrapping paper. And I like to make it personal and handmade. It's also very eco friendly. I made colorful flag banners by carving one little flag and stamping it in different colors next to each other. It worked perfectly on this brown paper. I drew a thin line to connect the flags and voila: a banner was born.
You can see where I got the inspiration for my latest stamp. It's a flag banner. Not just one flag, but a whole row. You'll be done sooner. If you have a small ink pad, like Memento Dew Drops, you can easily give each flag a different color. Of course you can get this brand new cheerful stamp at Stoffer + Blik. As always, it's one of a kind!
Saturday, September 14, 2013
Foreign memories
My home is filled with souvenirs from places I have been. I see them all the time and it reminds me of good times and inspires me to plan some more travels. I had to learn to pick my souvenirs wisely, though. I have a rule for that now. It must be at least two of the following: gorgeous, useful or have a special memory attached to it, such as the ridiculous market where you have bought it.
I have thrown out the stupid, ugly and useless. Turkish scarfs that fell apart after washing them once. A hideous miniature Eiffel tower (what was I thinking?). I still have a glass/metal lamp from Delhi, India. But that one definitely belongs in the category tourist crap, with glue all over the place. In the craziness of an Indian market I actually bought it and I regretted it the minute I walked away. But I took it home anyway and it's still here, but I will throw it out soon.
The souvenirs that are actually useful are the best. The bowls I have bought in Turkey and Maroc. The wooden coffee cups from Norway, the clay foot scrubber from Maroc and the very best: camel leather slippers from Jerusalem. I already dread the day they are all worn out. The only thing to do then is go back and get me another pair. Here is a selection of the foreign stuff that has found a place in my home.


I also have some Indian and Nepalese money, that is also kind of a souvenir. You can't touch it without disinfecting your hands immediately after... I already spent my Turkish and Moroccan bills, because I went there a second time. I will keep my US dollars though, because I found it so strange to have them in my hands for the first time. I had seen it on television a million times and we used the same kind in our 'Monopoly' games. I don't know, it just feels like toy money. It still does.

I have thrown out the stupid, ugly and useless. Turkish scarfs that fell apart after washing them once. A hideous miniature Eiffel tower (what was I thinking?). I still have a glass/metal lamp from Delhi, India. But that one definitely belongs in the category tourist crap, with glue all over the place. In the craziness of an Indian market I actually bought it and I regretted it the minute I walked away. But I took it home anyway and it's still here, but I will throw it out soon.
The souvenirs that are actually useful are the best. The bowls I have bought in Turkey and Maroc. The wooden coffee cups from Norway, the clay foot scrubber from Maroc and the very best: camel leather slippers from Jerusalem. I already dread the day they are all worn out. The only thing to do then is go back and get me another pair. Here is a selection of the foreign stuff that has found a place in my home.
I also have some Indian and Nepalese money, that is also kind of a souvenir. You can't touch it without disinfecting your hands immediately after... I already spent my Turkish and Moroccan bills, because I went there a second time. I will keep my US dollars though, because I found it so strange to have them in my hands for the first time. I had seen it on television a million times and we used the same kind in our 'Monopoly' games. I don't know, it just feels like toy money. It still does.
Wednesday, September 11, 2013
Happiness in your non-digital mailbox
After a lovely and exhausting week of exploring Lisbon I am back home. These trips are killing. I need rest. So I bought Flow magazine, made myself a cup of tea and sat down on my couch. Relax mode. Flow wrote an article on postcrossing. I love that. It inspired me to send some cards and write about it here. I started being a postcrosser 1074 days ago, according to my postcrossing profile. I am not sending as many cards as I should and therefore not receiving as many as I want. I am changing that right now.
 For those of you who don't know what postcrossing is: it's real simple. The postcrossing website will give you the address of a random postcrosser in the world. You send them a pretty postcard or a letter. Write something on it about yourself or whatever you want. You will get a notification, usually with a thank you email from the recipient, when it has arrived. It also states how many kilometers it has traveled and how many days it took to get there. Once you have sent one card, your address can be given to another postcrosser and you can expect a card in your own mailbox. The more cards you send, the more you will receive.
I have received very different cards from all over the world. Some are gorgeous illustrations, that are still hanging on my wall, others are hideous views of depressing places. But it's always interesting. Someone completely unexpectedly writing you and wishing you a wonderful day just brings a smile to my face. I like the excitement of opening my mailbox and hoping to see something other than blue (tax) envelopes and a flyer from the pizza place around the corner. Once I received the most beautiful package from China. It was a big envelop, covered with all these pretty stamps. And inside the envelope there was a collection of things, lovely things. Pretty paper, Chinese coins, a lollypop, a long handwritten letter, some collectors cards, a button and more. This was postcrossing at its best. It made my heart jump. I used a few of these stamps in my necklaces. The one with the pink love birds is still for sale at Stoffer + Blik.

If you love paper, snail mail, people and foreign places, I think you should give this a try. Besides the cards and the stamps it is completely free. A little happiness on your doormat! Now I am off to write a postcard to Charlotte in Germany.
I have received very different cards from all over the world. Some are gorgeous illustrations, that are still hanging on my wall, others are hideous views of depressing places. But it's always interesting. Someone completely unexpectedly writing you and wishing you a wonderful day just brings a smile to my face. I like the excitement of opening my mailbox and hoping to see something other than blue (tax) envelopes and a flyer from the pizza place around the corner. Once I received the most beautiful package from China. It was a big envelop, covered with all these pretty stamps. And inside the envelope there was a collection of things, lovely things. Pretty paper, Chinese coins, a lollypop, a long handwritten letter, some collectors cards, a button and more. This was postcrossing at its best. It made my heart jump. I used a few of these stamps in my necklaces. The one with the pink love birds is still for sale at Stoffer + Blik.
If you love paper, snail mail, people and foreign places, I think you should give this a try. Besides the cards and the stamps it is completely free. A little happiness on your doormat! Now I am off to write a postcard to Charlotte in Germany.
Monday, September 2, 2013
Mail & Win!
Time was just flying this morning when I was working on my latest creation: a brand new stamp. And it's a beauty, if I may say so myself. It took me a while, documenting it during the process was slowing it down a bit too. But I think it's nice to show you how something like this comes together. So this is what I made...


This giveaway will end at September 30th 2013. I will email the winner and announce it here and on twitter as well. I'll send it worldwide. So if you are not in the Netherlands, no problem!
...and this is how I made it.
MAIL & WIN
And the best part: it can be yours. You can WIN it! All you have to do is tell me you want it in the comments below (don't forget to mention your email address) or send me an email if you want to keep it private.This giveaway will end at September 30th 2013. I will email the winner and announce it here and on twitter as well. I'll send it worldwide. So if you are not in the Netherlands, no problem!
Thanks for joining this giveaway and spread the word!
Sunday, September 1, 2013
Frying flowers
You are about to hear something from me that I heard my mom say that my aunt had said to her. So this is very reliable information. Just so you know. You can fry and eat zucchini flowers. And it's supposed to be delicious. When I heard it, I thought I might try that one day. And then I was flipping through Veg! and there it was. So it must be true.


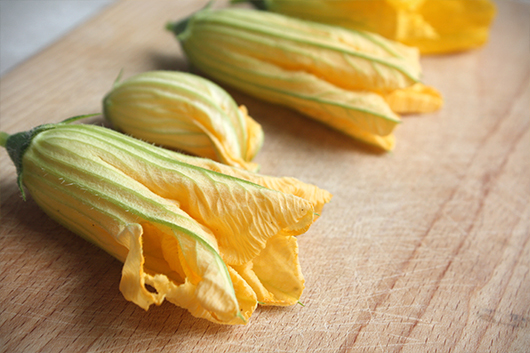


And guess what, I have three pumpkin plants on my balcony that have the same flowers, it seems. I am taking the risk and using pumpkin flowers instead. I hope they're not toxic or this might be my last post.
After checking my cupboard for the ingredients, I harvested a couple of nice looking flowers. Washed them off a little and checked the inside for bugs. Important step, that last one.
According to the recipe I needed to use ricotta cheese and herbs and then add a little goat cheese. I only had soft goat cheese in my fridge, so what the hell. I made a little mix of the goat cheese, chives, parsley and thyme. Added some salt and pepper and then gently stuffed the flowers with the mixture.
Before frying these flowers, I rolled them in a frying batter. Then I put them in a pan with hot sunflower oil, letting them sizzle for a few minutes untill crispy and slightly colored.
And now the moment of truth is here. Is it really an exquisite delicacy? The answer is 'I think so'. If you follow the recipe. It was okay the way I did it. But goat cheese has a strong flavor and so does the crispy batter. Not bad, but I wanted to taste the flower. And I didn't.
In the recipe it says you can also leave the filling out all together. I think that's a better option than mine. Or follow the recipe with the ricotta cheese. I am happy to give you the recipe if you want to try it. Let me know in the comments.
Subscribe to:
Posts (Atom)